| |
Note: these are not the only files, but are the most important
Introduction
This looks like a UPX packed binary, but its not corrupted, so we can unpack it without trouble.
Information collecting
When analyzing this file, its noted that it imports a lot of stuff.
I starting reversing engineering this binary, but could not understand what
is going on, there is about 2235 functions and no clear entry or useful code.
Until I saw a string "his is a third-party compiled AutoIt script".
So I looked into this AutoIt and found that its a scripting language result in a compiled binary.
There is a decompiler [Exe2Aut], which can be used to decompile AutoIt scripts.
The content of the decompiled script can be found in:
- Decompiled_codeit:
Looking at the code, its messy, lets try to fix it.
Fixing numbers
Starting from line 134 a block of variables that are only numbers,
and not reassigned is present. We can fix it with:
The content of the new script (also removed the whole numbers block manually) is present in codeit_numbers_fixed.au3.
Fix $os strings
| |
This is used to register a function to run at the beginning,
This function just splits the large string by "4FD5$".
The $os strings are always used with the arehdidxrgk function,
which decodes the hex string.
We can fix this also:
| |
The content of the new script is present in codeit_os_fixed.au3.
Renaming functions
This step might not be necessary, but it makes analysis easier. This is done through static analysis, example for this:
| |
For example this function, seems to setup a 1024 buffer and calls GetComputerNameA,
we can assume from this that this function’s purpose is to call GetComputerNameA
and rename it accordingly. There are many for these, which are easy to analyze so I’ll not
go through all of them.
The final result is available in codeit_renames_fixed.au3.
main function
Now with a clean code, let’s start.
This is the most important pieces of main:
| |
In these parts, justGenerateQRSymbol is called from qr_encoder.dll with the input string as
argument. Then areyzotafnf is called with the resulting data.
Finally justConvertQRSymbolToBitmapPixels is called and the image is being displayed.
From above, areyzotafnf looks really suspicious. And looking into this function,
it actually calls some crypto functions, so lets look into it.
areyzotafnf function
The entry of the function:
| |
In here, we see the computer name is passed to aregtfdcyni in lower case,
Looks like the buffer is being edited inplace. Then that buffer is hashed,
then a large chunk of data is decrypted with the hash.
Lastly, the resulting buffer should start with FLARE and end with ERALF.
If all of this passes, the argument is modified:
We clearly don’t know the correct computer name, but we have aregtfdcyni to check.
aregtfdcyni function
The variables in function in the last fixed file are all renamed for easier analysis.
What the function does:
- Read the sprite image.
- Takes the
LSB(least significant bit) of the first pixels of the image and group them into7-bitnumbers. - Add each of the resulting bytes buffer the computer name buffer bytes.
- Do one
ROR(rotate 1 bit to the right).
So looks like its encrypting the computer name with data from the sprite image. We can extract the resulting buffer from the image with the script below:
| |
In the script, first we read the image and ignore the first 54 bytes as they are BMP file header.
Next, we group every 7 bytes together and generate the 7-bit number. Lastly, we output the first 15 characters, because in windows, computer name can be 15 characters.
The result:
| |
And that is very interesting. When I saw this I thought it is the correct computer name.
Solution
We can try to apply aut01tfan1999 in place of our computer
name in areyzotafnf:
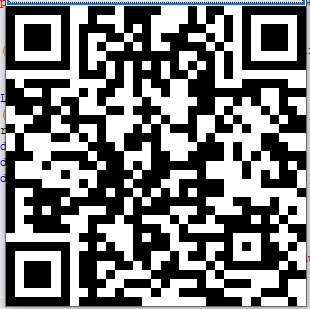
When running the app, the QR code is different from the default (No matter the input), and this is a good sign for it being the flag.

Then using any way to read the QR code we get:
| |